Have you bought an Android phone recently? Here we bring 7 steps to configure your Android completely. Configuration is the key point in phones and cell phones, one of the most important things. This is where we connect to the Internet, add our Google account, copy the data from the previous mobile and customize a new one in our style. Configuration is not only important, but also necessary.
Every time we have a new android mobile phone, either because we have bought it or it has been given to us. We must take the time to configure it, to be able to use it comfortably. This is usually a bit boring. That is why we are going to point out a series of steps, to make this process faster.
7 ''yes or yes'' steps to configure your new Android completely
Steps to set up a new Android
-
Choose Android language
The first step that all manufacturers request is to choose the language to operate our phone. We must be careful with our selection.
If by mistake we choose a language that we do not master, going back to the selection of our correct language will not be an easy task. Also selecting Spanish, for each country can be very important. So this step should not be left lightly.

Later we can change android keyboard language. If you write in more than one language, this is going to be really useful for you.
-
Connect to a Wi-Fi network
The next thing the system asks us is to connect to a Wi-Fi network. It is not mandatory to continue with the process. But it is highly recommended that we use a Wi-Fi connection if we have one. Since in addition to facilitating downloads and updates, it would not generate additional mobile data costs.
Connect to a Wi-Fi network, it will help us for the following steps when configuring your new Android.
-
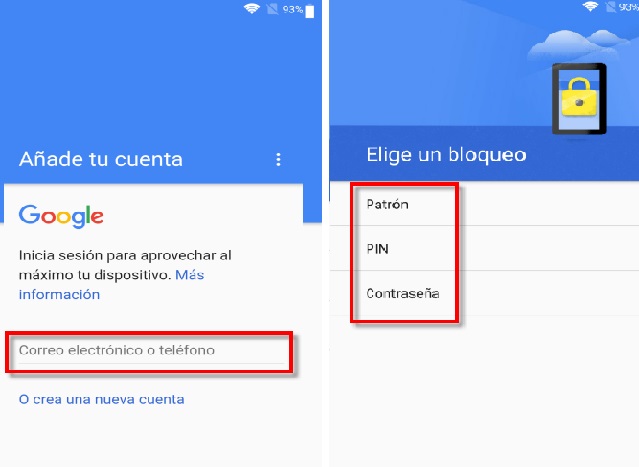
Add our Google account
We must link our phone with our Google account. If we already have a Google account, we must choose the option to access or use account.

This way we can synchronize our data from the previous device. If we do not have a Gmail account, we proceed to create it. you can get one google account here.
-
Update software, apps and Android
There is a possibility that we have to update our device because we have a mobile with an old version of Android. Ideally, update it before you start using it.
To do this we go to Settings, then click on About phone. Then we select software update and press download update in any case. If there is news on the android version, it will show it to us and we can update. Otherwise, it will inform us that we have the phone with the latest version installed.
-
Personalization of your Android
Once the phone has been updated, we move on to one of the last steps. we can start to customize our smartphone in the style that we like the most. In this step it is up to us to choose the animated wallpapers or widgets and shortcuts.
-
Application download
In order to get the most out of our Android. We must start downloading applications on Google Play. If we skip step number three, then it's time to do it. because otherwise we will not be able to get any of the applications that we want to download.
In case I show you pending download on Google PlayIt will be time to fix it.
-
Screen lock and security
We cannot leave our device unprotected. For that reason we must establish a screen lock. Choosing between a pattern, a password, fingerprints, face unlock or a pin. Everyone chooses according to their security preference. This would be helpful in case our mobile is stolen or lost.

With all these steps we would have finished configuring our Android mobile, but basic form. Because even more adjustments can be made, for its configuration, if we want it that way. Already this from the first configuration, if we apply these steps it will be a quick and easy task.